Detailed Guide to Deploying a Multi-Agent System in OpenClaw
OpenClaw Multi-Agent is an architecture that allows running multiple independent agents within a single gateway, where each agent has its own workspace, configuration, permissions, and routing. This article introduces how to organize OpenClaw Multi-Agent, set up workspaces and bindings, apply security policies and sandboxing, optimize costs via sub-agents, and deploy the system through specific steps.
Key Takeaways
- Basic Concept: Understand the Multi-Agent architecture within the OpenClaw ecosystem, helping you grasp how to operate multiple independent AI assistants on a single gateway platform.
- Key Benefits: Identify the strategic value of transitioning to a multi-agent model, helping organizations properly evaluate suitability and make accurate system upgrade decisions.
- Environment Setup: Master the principles of isolating workspaces for each agent, helping the system completely prevent serious conflicts regarding data and login sessions.
- Routing Mechanism: Understand the principles of message flow based on priority, allowing you to accurately control and coordinate requests from multiple channels to the correct responsible agent.
- Security and Permissions: Know how to set up safety boundaries and isolated environments (sandboxes) for each type of agent, protecting the server infrastructure from unauthorized intervention risks.
- Cost Optimization: Grasp the mindset of resource allocation and AI model tiering based on task complexity, helping businesses perfectly balance processing performance and cost considerations.
- Deployment Process: Master the logic of setting up a system from initial initialization to the testing phase, allowing you to confidently operate a multi-agent Gateway without technical barriers.
- FAQ: Get answers to common troubles regarding AI memory, risks of sharing authentication files, and debugging methods, helping you proactively handle incidents during real-world operation.
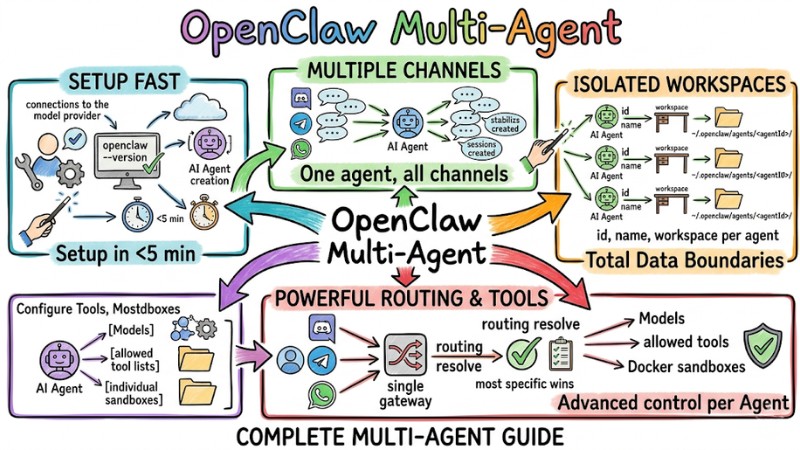
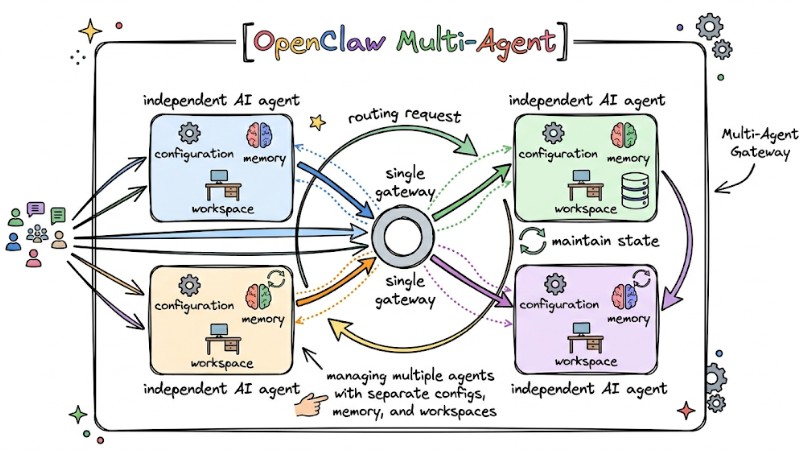
Introduction to OpenClaw Multi-Agent
OpenClaw Multi-Agent is an architecture that allows a single gateway to manage multiple independent AI agents, with each agent having its own configuration, memory, and workspace. The Multi-Agent Gateway is responsible for receiving requests from different channels, routing them to the appropriate agent, and maintaining state for each agent within the same process.
The OpenClaw Multi-Agent system operates on a single gateway process, where each agent is isolated by its workspace, state directory, and session store. This isolation allows multiple agents to work on one Gateway while maintaining data and configuration boundaries between different roles or use cases.
OpenClaw supports two primary operational forms:
- Persistent Agents: Function as independent entities tied to a specific account or channel (e.g., Code Agent, Customer Support Agent).
- Sub-agents: Automatically initialized to perform small tasks (e.g., searching for information, analyzing logs) and release resources upon completion.
OpenClaw Multi-Agent and its two main operating modes
Key Benefits of OpenClaw Multi-Agent
The following benefits show why the Multi-Agent model in OpenClaw is suitable for individuals, teams, and SaaS products:
- Data and Context Isolation: Each agent has its own workspace, state, and memory, helping separate work, personal, and side projects, avoiding the mixing of conversation history or files between agents.
- Resource and Permission Control: Each agent has its own tool configuration and access rights for files, exec commands, or the web, supporting the separation of teams, channels, and dev or prod environments by agent.
- Cost and Performance Optimization: OpenClaw allows assigning different models to each agent based on task complexity and leveraging sub-agents with lighter models for auxiliary tasks, while keeping powerful models for the primary agent to balance cost and quality.
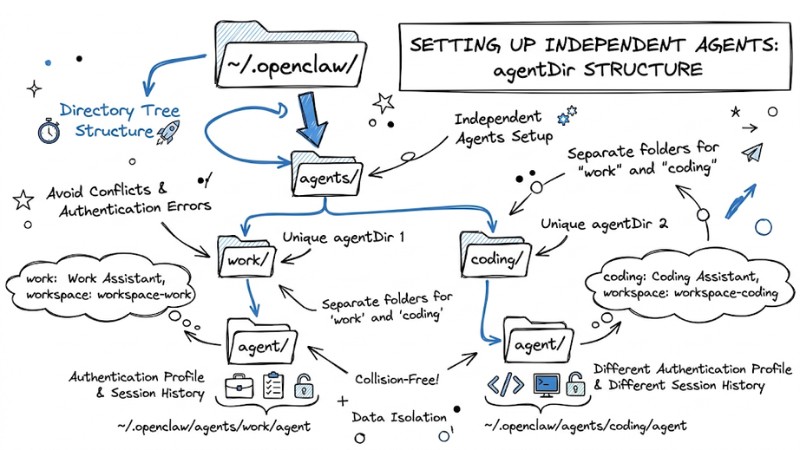
Setting Up Independent Agents: Workspace and agentDir
Each agent in OpenClaw requires its own workspace and agentDir to avoid conflicts between sessions, authentication profiles, and configuration files. Do not reuse the same agentDir for multiple agents as this causes collisions in auth profiles and session history.
Steps to set up via CLI:
- Initialize Agent: Use the wizard to generate the directory structure automatically:
openclaw agents add <agent-name> - Configure Directory: Ensure each Agent has a unique
agentDirin~/.openclaw/agents/<agentId>/. - Declare in Configuration File: Define the Agents in the
agents.listfile:
agents: {
  list: [
    {
      "id": "work",
      "name": "Work Assistant",
      "workspace": "~/.openclaw/workspace-work",
      "agentDir": "~/.openclaw/agents/work/agent"
    },
    {
      "id": "coding",
      "name": "Coding Assistant",
      "workspace": "~/.openclaw/workspace-coding",
      "agentDir": "~/.openclaw/agents/coding/agent"
    }
  ]
Note: Do not share the agentDir between Agents to avoid authentication errors (Auth profiles) and session overwriting.
The directory tree structure displays separate folders
Routing and Bindings: Directing Messages to the Correct Agent
Routing Mechanism and Priority in OpenClaw
Routing in OpenClaw is based on the "most specific wins" principle, meaning the most specific matching rule is selected to decide which agent receives the message.
- Routing Mechanism: The system evaluates bindings based on specificity and selects the most detailed matching binding for the incoming message.
- Primary Match Criteria: channel (WhatsApp, Telegram, Discord, Slack), accountId (when multiple bot accounts exist on the same channel type), peer (specific DMs or groups/communities), guildId, and roles for Discord.
Routing priority order (from highest to lowest):
| Order | Match Criteria | Description |
|---|---|---|
| 1 | peer |
Exactly matches the sender or conversation object (e.g., a specific DM). |
| 2 | parentPeer |
Matches by discussion thread, ensuring the entire thread goes to the same agent. |
| 3 | guildId/roles |
Matches by server or role in Discord to separate agents by group or permission. |
| 4 | accountId |
Matches by bot account or default configuration for the entire channel. |
Configuring Bindings in the Config File
Bindings determine which agent processes a message based on matching conditions, typically declared in openclaw.json or agents.list.
- Binding Structure: Includes fields such as agentId, match (channel, accountId, peer, guildId, roles), and priority if supported, allowing specific Feishu, WhatsApp, or Discord groups to be assigned to different agents.
- Configuration Example: A "support" agent can be bound to a customer support channel on WhatsApp, while a "dev" agent handles internal channels on Discord.
CLI Support for Checking Routing
OpenClaw provides CLI commands to view and test configured bindings:
- List Bindings:
openclaw agents list --bindingsoropenclaw routing listto see current routing rules and corresponding agents. - Simulate Routing Results:
openclaw routing resolve --channel...with matching parameters to check which agent a simulated message would be sent to.
Security, Sandboxing, and Permission Management in a Multi-Agent Environment
In the OpenClaw multi-agent environment, separating permissions and tool surfaces between agents is central to avoiding scenarios where a public bot has access to system files or dangerous commands.
- Public vs. Internal Agent Separation Principle: Agents serving the public (community channels, customers) should only be allowed to use low-risk tools, while internal agents are granted permissions for file systems, exec, or internal networks.
- Tool Policies by Agent: Each agent can configure
tools.allowandtools.deny, where deny rules always take precedence - meaning if a tool is in both allow and deny, it will be blocked.
Example of limiting tools for a public agent:
agents:
  - id: "public-bot"
    tools:
      allow: ["read_web"]
      deny: ["file_system", "exec"]
- Docker Sandbox and Isolation of Dangerous Tasks: Tasks capable of impacting the system, such as exec, file access, or network access, can be configured to run in a Docker sandbox to limit file read/write and network access within the container scope.
- Permissioning by Channel and Group: It is recommended to use separate agents for family, work, and public use, each with its own rules and tool policies, instead of sharing a single highly-privileged agent across different user groups.
- Sharing Auth Profiles Between Agents: Only share
auth-profiles.jsonwhen agents are within a trusted boundary; for public agents or agents in different environments, separate the auth profile files to avoid the risk of exposing login information and access rights.
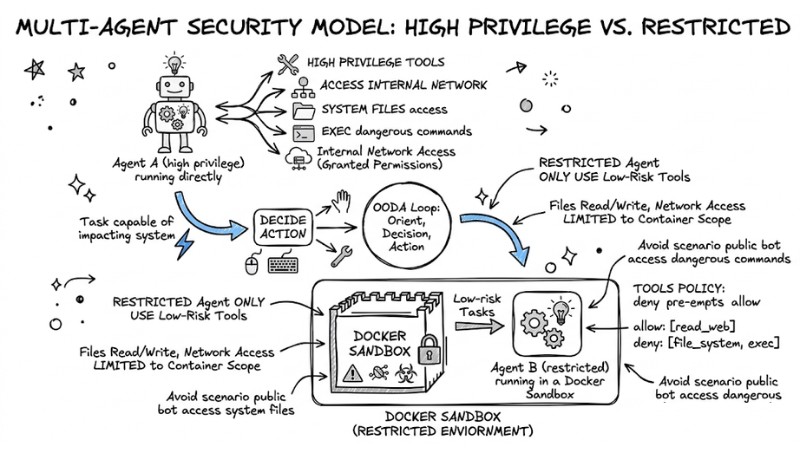
The principle is to separate public agents and internal agents running within a Docker Sandbox
Optimizing Performance and Cost in OpenClaw Multi-Agent
The following strategies help reduce API costs and improve performance when operating multiple agents and sub-agents in OpenClaw:
- Use Sub-agents to Offload: Offload auxiliary tasks such as searching, log analysis, or large file processing to sub-agents rather than having the primary agent handle everything, reducing wait times and costs on high-end models.
- Model Tiering by Agent Type: Assign powerful models to persistent agents serving primary conversations and decision-making, while configuring sub-agents to use cheaper or faster models for background tasks like data collection or batch processing.
- Session Lifecycle Management and Cleanup: Enable auto-clean mechanisms or set resets by day and idle time to limit the number of existing sessions, and archive or delete very old sessions of persistent agents to prevent system slowdowns.
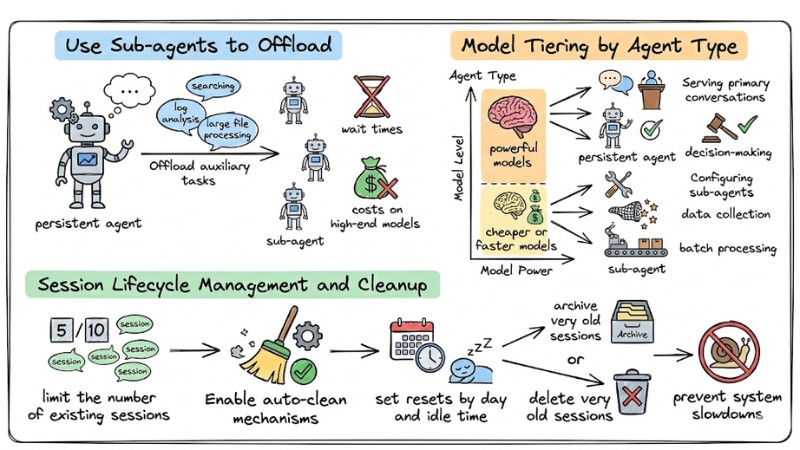
Performance and cost optimization strategies in OpenClaw Multi-Agent
Step-by-Step Multi-Agent OpenClaw Deployment Guide
Prepare Environment and Install OpenClaw
Install OpenClaw following the official guide, including required runtimes and connections to the model provider you use. Confirm that the openclaw --version command works and the Gateway can start in default mode before adding multiple agents.
Step 1: Create the First Agent and Check Channels
Use the CLI to create the first agent and configure the connection to a single channel like Discord, Telegram, or WhatsApp. Send several test messages to ensure the agent responds correctly on the configured channel and sessions are created stably.
Step 2: Create Additional Agents with Unique Workspaces and agentDirs
Create more agents using CLI commands, each with its own workspace and agentDir under ~/.openclaw/agents/<agentId>/. Update the configuration file to fully declare the id, name, workspace, and agentDir for each agent to avoid session conflicts.
Step 3: Set Up Bindings and Routing by Channel or Peer
Define bindings in openclaw.json or agents.list to link each agent to a specific channel, accountId, peer, or guildId. Apply the "most specific wins" rule and use openclaw agents list --bindings or openclaw routing resolve to check which agent messages will be routed to.
Step 4: Configure Tools, Models, and Sandboxes for Each Agent
Set up models, allowed tool lists, and individual sandboxes (if any) for each agent based on trust levels and task complexity. Apply tool policies with tools.allow and tools.deny, and configure Docker sandboxing or restricted permissions for tools performing file operations or exec.
Step 5: Restart Gateway and Verify via CLI or Logs
Restart the Gateway after updating the configuration to load the new agent list, bindings, and tool policies. Use commands like openclaw agents list, openclaw routing list, and openclaw logs --follow to confirm each agent is working correctly, routing is accurate, and there are no errors in the logs.
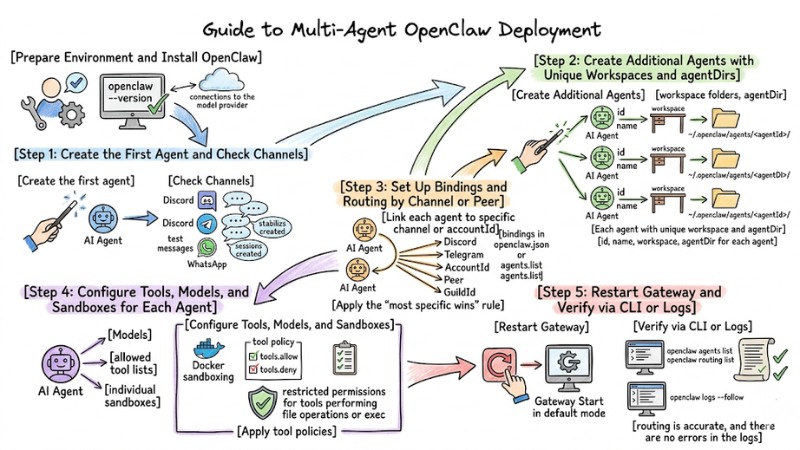
OpenClaw Multi-Agent Deployment Process
Answering Frequently Asked Questions
Why doesn't my Agent remember information after a restart?
Check if the agentDir is set up correctly. If the agentDir is misconfigured, session files will not be saved in that Agent's correct directory.
Can I share login permissions (Auth profiles) between Agents?
Yes, you can copy the auth-profiles.json file from one Agent's directory to another Agent's agentDir. However, it is recommended to create separate Auth Profiles for safety.
How do I debug when an Agent does not respond to messages?
Use the command openclaw logs --follow to monitor the routing process. If no logs appear, re-check the Binding configuration in the openclaw.json file.
Read more:
- MCP Server Best Practices: Optimizing Performance for AI Agents
- Claude Code MCP Setup Guide: Optimizing AI Coding Agents
- Operating an AI Agent Teams: Risk Management for the Digital Workforce
OpenClaw Multi-Agent helps isolate context and permissions between agents, routes messages accurately by channel and peer, and leverages sub-agents and model tiering to optimize operating costs. By fully applying these best practices for configuration, security, and deployment of OpenClaw Multi-Agent, you can scale from a single assistant to a multi-agent system serving work, products, and public channels while maintaining clear control over the data and behavior of each agent.